 Sometimes the reason for not taking advantage of more complex features in programs is that they take multiple steps to complete. For those deterred from these features or functions, Microsoft Outlook has a Quick Steps feature that takes the pain out of multiple-step processes and reduces it to the click of a button.
The primary advantage of using Quick Steps is that they are completely customizable, so you can create custom commands with a few simple steps. For instance, an Outlook Quick Step can make a custom Send and Archive shortcut, so it can store the message into a specific folder for later review. You can even make a Send and Delete action, so your inbox won’t be bogged down by unnecessary emails. Quick Steps can hold up to six of your most convenient functions in your Outlook ribbon, so make sure to pick the ones that enhance productivity the most.
Getting started with Quick Steps is simple enough to jump into right away. You can approach this goal three different ways:
- Edit an existing Quick Step.
- Create a Quick Step based off of an action.
- Create a brand-new Quick Step from scratch.
If you’re more comfortable selecting the default Quick Steps, you can do that, too. Outlook has a whole slew of them ready to use at a moment’s notice, provided by the Microsoft Office support website:
- Move to: Moves the selected message to a mail folder that you specify and marks the message as read.
- To Manager: Forwards the message to your manager. If your organization uses Microsoft Exchange Server, your manager’s name is detected in the Global Address List and inserted in the “To” box, or you can specify the recipient.
- Team E-mail: Forwards the message to others in your team. If your organization uses Microsoft Exchange Server, your team members names are detected in the Global Address List and inserted in the “To” box.
- Done: Moves the message to a specified mail folder, marks the message complete, and then marks it as read.
- Reply & Delete: Opens a reply to the selected message, and then deletes the original message.
- Create New: Create your own Quick Step to execute any sequence of commands, name it, and then apply an icon to help you identify it.
Editing an Existing Quick Step
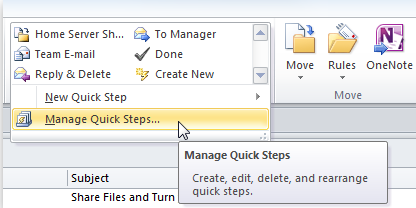
Go to Mail > Home > Quick Steps group. Click More at the side of the Quick Steps box, and click Manage Quick Steps.
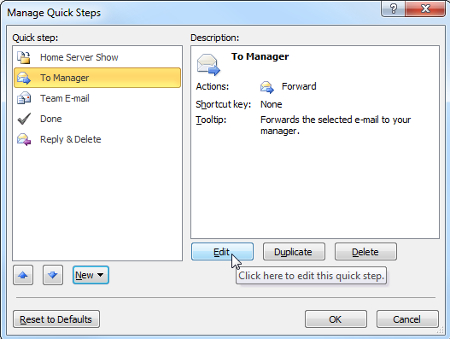
In the Quick Step box, choose the Quick Step you want to edit. Click Edit.
Under Actions, change or add a new function to the Quick Step.
Creating a New Quick Step
- Select Mail > Home > Quick Steps group > Quick Steps gallery, and select Create New Quick Step.
- Select an action from the list, or create a new one by clicking Custom.
- Give your new Quick Step a name by entering it in the Name box.
- Under Actions, select the action that you want the Quick Step to fulfill. Select Add Action to add it to the list. Do this for all actions you want your Quick Step to do.
- You can then create a keyboard shortcut for your Quick Step by selecting it in the Shortcut key box.
By taking advantage of Quick Steps, you can turn your inbox into a productivity machine rather than an annoying time waster. For more tips on how to make the most of your Microsoft Office suite, give Quikteks a call at 973 882 4644.


